NautilusLog IHM Maintenance Guide for Crew Tasks
1. Introduction-
The NautilusLog IHM Tool is designed to support vessel crews in complying with the Inventory of Hazardous Materials (IHM) regulations. This guide provides detailed instructions for crew members on handling, recording, and reporting tasks related to items onboard that may contain hazardous materials.Proper use of the tool ensures:
-
Compliance with international IHM regulations.
-
Accurate documentation of hazardous materials.
-
Streamlined communication between vessels, headquarters (HQ), suppliers, and IHM Experts.
2. IHM Maintenance Process Overview-
How we streamline IHM Maintenance Process
-
Requisition Creation – The vessel requests items required onboard from the HQ.
-
Approval & Purchase – The cHQ approves requisitions and issues Purchase Orders (POs) to suppliers.
-
Delivery & Documentation – Suppliers deliver items to the vessel and provide documentation to NautilusLog and IHM experts.
-
Data Processing – IHM experts process the PO data (via API or manual imports) and categorize items as IHM relevant or not relevant.
-
Task Creation – For IHM relevant items, crew tasks are generated in the NautilusLog IHM Tool by the IHM Expert.
-
Crew Execution – Vessel crew must complete all assigned tasks: storing, installing, discharging, or tagging items.
The Inventory of Hazardous Materials (IHM) is a regulatory framework that ensures vessels are monitored for the presence of dangerous substances throughout their operational life. To simplify identification and management, hazardous materials (HazMats) are divided into two categories: Table A and Table B.
3.1. Table A – Substances to be Removed-
Definition: These are materials considered prohibited for use onboard ships under international conventions (such as the Hong Kong Convention and EU Ship Recycling Regulation).
Requirement: If present, they must be identified, flagged, and safely removed from the vessel.
Rationale: Such substances pose significant health and environmental risks even when left unused onboard.
List of IHM Table A Hazmats:

3.2. Table B – Substances Allowed with Documentation-
Definition: These are materials that may still be used and allowed onboard but are strictly controlled.
Requirement: Their presence, location, and handling procedures must be documented in the IHM, ensuring traceability throughout the vessel’s lifecycle.
Rationale: These substances are not outright banned but require oversight to prevent misuse, accidental release, or unsafe handling.
List of IHM Table B Hazmats:

4. Crew Responsibilities in Managing IHM Materials-
After hazardous materials are categorized into Table A and Table B, the vessel crew plays a crucial role in ensuring compliance by handling these materials appropriately. Each category dictates a specific type of crew action and documentation requirement.
4.1 Handling of HazMat Items-
Table A items (e.g., asbestos, ODS): Must be carefully isolated and prepared for removal. No new installation or storage is allowed.
Table B items (e.g., heavy metals, PCBs): Can be used or stored onboard, but their exact location and condition must be tracked.
Crew must ensure safe handling during delivery, deck transfers, storage, or installation, following established safety protocols to avoid contamination or exposure.
4.2. Tagging of Items-
Every IHM-relevant item must be clearly identified. Crew are responsible for printing and attaching IHM-compliant tags immediately upon receipt.
Tags should be:
- Durable and clearly legible.
- Attached in a way that remains visible during storage, installation, or transfer.
All actions related to IHM items must be logged into the NautilusLog system, including:
Handling (delivery, storage, installation and movement).
Tagging (when and where the tag was applied).
Removal or discharge (with supporting documents).
Documentation must be accurate, complete, and uploaded in real time.
Supporting files (e.g., discharge receipts, removal certificates) must always be attached for compliance checks.
4.4. Removal of Items listed as Hazardous Materials-
For items classified under Table A, crew must ensure their safe removal as per IHM and environmental regulations.
Discharge must always be accompanied by proper documentation uploaded in NautilusLog.
Improper removal or undocumented discharge can result in serious compliance violations.
5. Crew Task Overview-
The following workflow applies whenever a new crew task is received in NautilusLog.

7. Performing IHM maintenance tasks-
Note: Vessel Crew members (Master/Captain) must register on NautilusLog to create an account and access IHM Maintenance for their vessel. Once registered, crew members can now access Crew Tasks on the Maintenance Tab of the IHM Tool
Registration Link: https://stage.nautiluslog.com
Moving further to navigate the software in detail:
7.1. Landing Page – Maintenance Tab-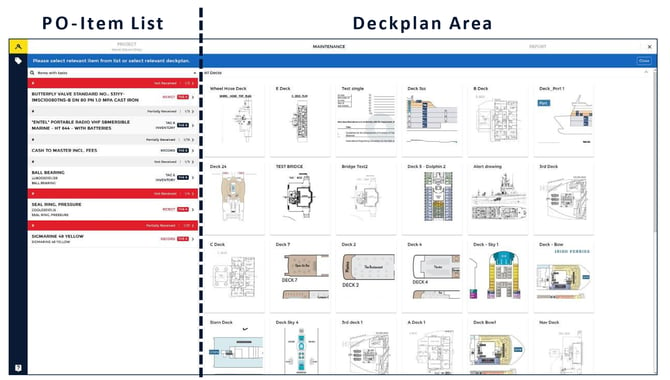
- The Maintenance Tab is your workspace where all crew tasks can be completed in an effective way.
- On the left side, you find a list of all orders for your vessel which require attention.
- On the right side, you find “Decks” view for easy navigation between the different decks to conduct your tasks in a professional manner.
7.2. Exploring further - Purchase Order List-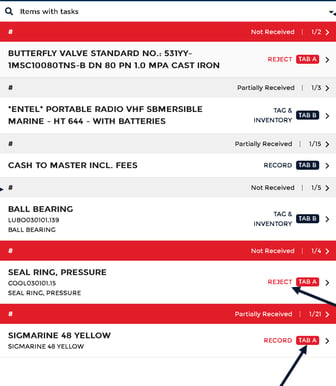
Full text search - You can search for any item by the PO number in this field.
Filter Icon: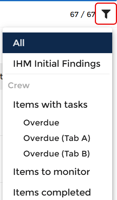
When using the filter function in the NautilusLog IHM Tool, crew members can refine the task view through the following options in the dropdown menu.
-
Items with Tasks – Displays all items that currently require crew action.
-
Items to Monitor – Displays items that do not require immediate action but must be monitored or addressed at a later stage.
- Items Completed – Displays all items for which tasks have been fully completed and no further action is required.

PO Status, Bar to view PO-Details.![]()
![]()
The PO Status Bar contains the PO number and the PO description for easy assignment. Next to it you find the information about the number of items that have a "task" in this PO.
7.3. Deck View-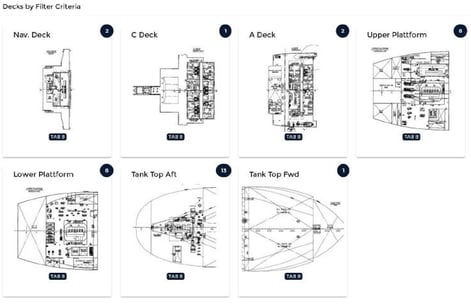
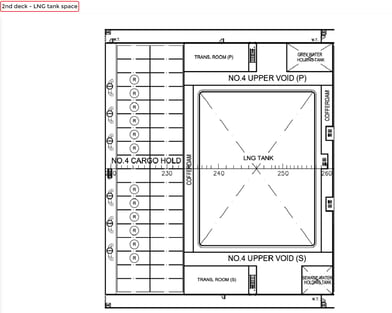
Note: Blue or red notification badges inform you about the amount of pins on this deck. If the location badge is yellow, there is a to do. Furthermore, by selecting any individual deck provides you with an enlarged deck view for better and detailed visibility
For example, selecting any deck as highlighted, navigates you to individual deck view 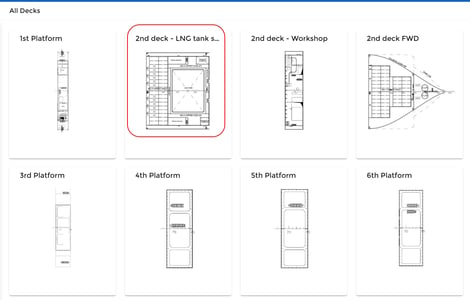
7.4. Handling of Items-
Items can be managed in three ways: stored, installed, or moved/transferred. These actions can be performed either by using the drag-and-drop function or by selecting the corresponding action buttons in the system.
The process is typically carried out as follows: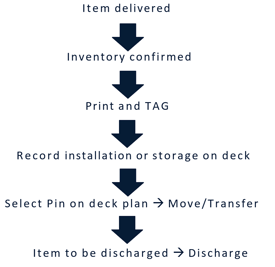
To manage an item, first select an entry from the “Items with Tasks” list to open the Item Detail view.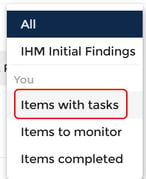
This view provides all relevant information about the selected item, along with specific instructions for the required action.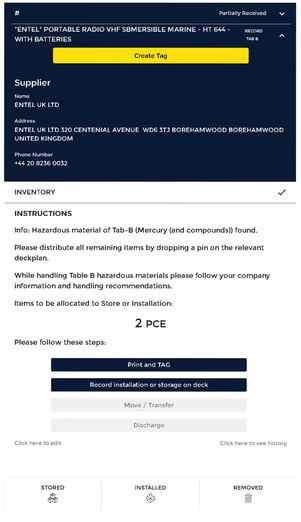
The next step is to create and print a Tag for the item. Once tagged, record the storage location or installation position directly on the designated deck plan within the system.
You can also make use of the filter option at the bottom (e.g., Stored, Installed, Removed) to display only the relevant pins on the selected deck plan. This allows you to quickly visualize the status and location of specific items.
7.5. Printing and Labelling Items-
When an item is selected from the Items list, you can choose the Print and Tag option. This will generate a QR code together with an alphanumeric identification code for the item.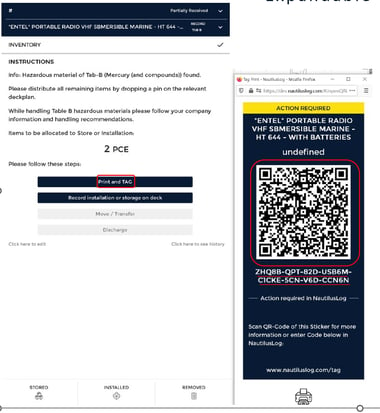
The tag should be printed, laminated, and securely attached directly to the item or placed near its installation or storage location. This ensures clear identification and traceability, particularly during future inspections or maintenance activities involving the item.
This tag can be searched and found via the Tag button as highlighted.
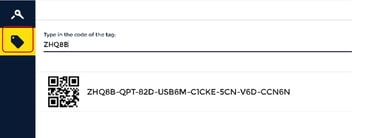
Entering the first five characters of the QR code is generally sufficient to locate the item in the system.
7.6. Recording Installation of the item or storing it on deck-
To record an installation or storage of an item, you may either click the button which is highlighted to launch the wizard or select an individual deck plan and place a pin using your mouse.  Afterwards, choose "Install" or "Store" to complete the action.
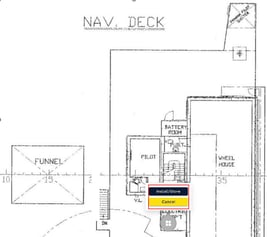
You can further select the quantity you need to install or store on the selected deck, along with the option to select the date along with necessary remarks.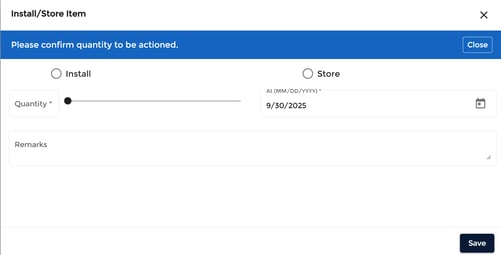
7.7. Removal of an item from the vessel- 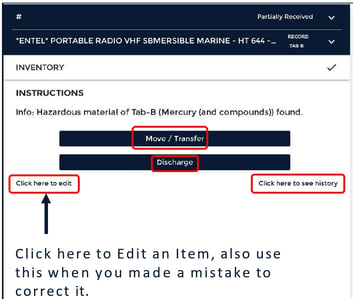
You can select the item you wish to remove from the item list and expand its Inventory tab. Here, several functions are available:
-
Move or Transfer the item to another location
-
Discharge the item from the vessel
- Edit the item details in case of recording errors
- the History of the item is displayed for reference.
The same functionality is also available for pins on the deck plan: you can select a location with your mouse, place a pin, and access the Move, Transfer, Discharge, or Edit functions directly from the pin.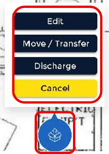
Lastly, you can define the quantity to be discharged and add a remark, if necessary, along with the option to set date. As a final step in the removal process, either upload a new receipt using the (+) button or select an existing receipt from the list. The list displays the most recently uploaded receipts at the top.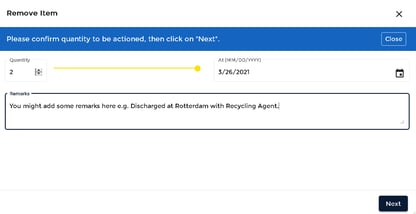
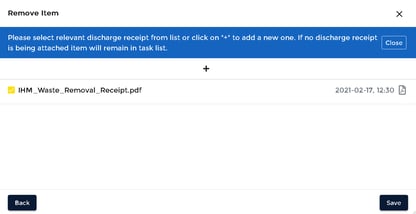
If no discharge receipts are listed, please ensure that a new receipt is uploaded. Finally, click "Save" to complete the process.
Following all these steps ensures accurate recording and tracking of all items, maintaining up-to-date inventory and documentation for IHM Maintenance.
If you need any further support whether it’s assistance with specific features, technical troubleshooting, or additional training, our Support Team is ready to help. We aim to provide clear, timely, and effective solutions so you can continue your operations confidently.